BREATHING FOR FREEDIVING: A BEGINNER’S GUIDE
The year is 2020, and the month is April. This means that there’s a good chance that you too are stuck at home, not able to access pools, open water, and freediving courses. If you’re new to diving, this is a great opportunity to build some technique now so you can slip into the water like a turtle when the time comes. One of the most important things we do is learn how to control our breathing for freediving.
The good news is that you can practice a lot of freediving breathing techniques whilst sitting on your sofa, waiting for your banana bread to bake.

BREATHING FOR FREEDIVING:
For a whole sport that involves not breathing, there’s actually a lot of stuff we do with our breath in freediving. In this article, I’m putting the actual breath-holding to the side for a moment so we can talk about freedive breathing in 4 parts:
Warm-Up
Breathing for Relaxation
The Breathe-Up (and a little bit of chat about hyperventilation)
Recovery Breathing
A QUICK NOTE ON SAFETY:
Reading a blog is very, very different to taking a course with a trained instructor, so please don’t use these techniques to push your limits. If any of these exercises cause pain, lightheadedness or tingling, stop and chill. As always, I really don’t recommend experimenting with your breath if you have existing medical conditions without first talking to your doctor.
BREATHING FOR FREEDIVING: WARM UP
First thing’s first. If you haven’t yet read How Freediving Works, I suggest starting there. You’ll learn about the fundamentals of what’s happening when we breathe, or stop breathing.
Before I begin any breath-holding, I like to warm warm up the ‘breathing muscles’ (I know, how weird, you do it all the time) by doing some focused breathing. You can combine this with some stretching or yoga.
Lie down or sit for these exercises:
STEP 1: BELLY/DIAPHRAGM BREATHING
Sit or lie down in a relaxed position
Focus on expanding your belly as you inhale, and bringing your belly back in towards your spine as you exhale
Your ribs and chest should stay still
Imagine air filling your lower belly
Practice this breathing for 1 minute
STEP TWO: INTERCOSTAL/RIB BREATHING
Think about moving your breathing action to your lower rib cage
Keep your chest and belly still, but expand your ribs sideways to breathe
One trick is to hook your thumbs on the side of your ribs and touch your fingers at the bottom of your breast bone. As you inhale and expand your ribs, your fingers should pull apart
Practice for 1 minute
STEP THREE: CHEST AND SHOULDER BREATHING
Now focus on filling your upper chest with air
Your chest should expand forward and upwards slightly as you inhale, whilst your belly and ribs stay still
Practice for 1 minute
I really like this 2-min video for explaining and demoing the exercise, with a lot more class than I would be able to show if I recorded myself…

BREATHING FOR RELAXATION
Hopefully after a little warm up you’re already feeling relaxed. For me, I like to have a conscious relaxation period before moving into a breathe-up, where I try to quiet my thoughts and get my heart rate nice and low. Throw on on a cheeky relaxation playlist and lie down somewhere comfortable, but not too hot or squishy.
Spend around 2 minutes in ‘slow-exhale breathing’. The point of this is to spend more time exhaling than inhaling. Exhalation decreases your heart rate, and that is what we love.
If it’s your first time, I recommend spending a bit longer playing around with the right number of counts for each inhalation and exhalation. You don’t want to be struggling or feeling tingly/dizzy to hit these numbers. Try this cycle to begin with:
Count to 4 as you inhale (don’t strain)
Count to 8 as you exhale (stay relaxed)
Pause for a couple of seconds
Repeat
Play around with these numbers to find what feels relaxing for you, but try to exhale for around twice as long as you inhaled for.
Use this time to also find some mental relaxation. Loosen up the tension in your body and move your mind to a happy, calm place. Here’s a video by my friend, Gert. I find Gert one of the most relaxing coaches to freedive with, and he has a whole series of incredibly helpful, short technique videos. Let me know in the comments if you’d like to hear more about mental relaxation techniques.
Remember, the point of this phase is to slow your heart rate and get your body and mind relaxed. If you’re planning to do some breath-holding practice, feel free to move into the ‘breathe-up when you’re ready.

THE FREEDIVING BREATHE-UP
I’m going to keep this simple. The truth is, there isn’t really a prescribed ‘perfect breathe up’ for freediving, because everyone is different. The perfect breath-up for you is the one that helps you achieve the most relaxation, and, as you get more advanced, one that takes the most advantage of your physical state.

STEP 1: TIDAL BREATHING:
Whether you’re breathing up on dry land, or between dives in the water, the best way to start is to try to go to sleep. Let yourself breathe naturally, as if you were in bed, and try to keep that mental relaxation. It’s called ‘tidal breathing’. We are not trying to breathe any more deeply or frequently than normal.
For me, I try to do 2-3 minutes of natural, relaxed breathing.
STEP 2: ‘FINAL BREATHS’
When you feel relaxed and ready to start holding, take a nice, deep, full breath. Some people like to call this the ‘final breath’, which is pretty morbid but there you go. Remembering the warm up we did, try to focus on filling air from the belly first, then the ribs, then the chest. Don’t suck in so much air that it hurts – you just want a nice, ‘full’ feeling.
At this point, you would typically begin your breath hold. My next post will include some exercises for breath-hold practice at home. For now, maybe try a very short hold until you feel feel an urge to breathe.
I often keep a hand on my stomach when I’m breathing up, just to connect to my breath
WHAT ABOUT HYPERVENTILATION?
Hyperventilation is any type of ‘overbreathing’, or breathing more air than you normally do. If you’ve done much Pranayama or breathwork, you might have already practiced some hyperventilation. Let’s be honest, you’ve probably also seen people doing it when spearfishing.
Most of my articles are written for totally new freedivers, and so I’m going to keep it simple and ask you not to hyperventilate during your Breathe-Up. Unless you’ve worked with a freediving instructor to help work out your Carbon Dioxode (CO2) tolerance, it’s not safe to hyperventilate. It flushes your CO2. This might make the breath-hold feel easier, but it will also send you into blackout earlier and with less warning.
If you really want to play around with hyperventilation, try taking 1-2 extra full breaths and exhales just before your final breath. Only practice this on dry land. If you get dizzy or tunnel visioned, stop.
RECOVERY BREATHING
It might not seem important, but recovery breathing is a technique every freediver should use to ‘balance out’ their levels of Oygen (O2) and CO2 after a breath-hold. Once you finish your breath-hold, you’ll have excess CO2 and lower levels of O2. We want to fix this pretty fast, so we use ‘recovery breaths’. You should practice recovery breaths after every single breath-hold or dive, no matter how small. You may not feel like you need it, but you do need to make this an automatic reaction – it might save you.
Recovery breathing looks like this:-
Open mouth wide and do a fast inhale
Close your lips and breath into them to create a big of pressure behind them
Pop your lips and make a ‘put’ sound whilst releasing air passively
Repeat this at least 3 times, more if you need. When you feel ready, give an signal to your buddy that you’re ok, and drop back into regular breathing.
-Repeat this at least 3 times, more if you need. When you feel ready, give an signal to your buddy that you’re ok, and drop back into regular breathing.

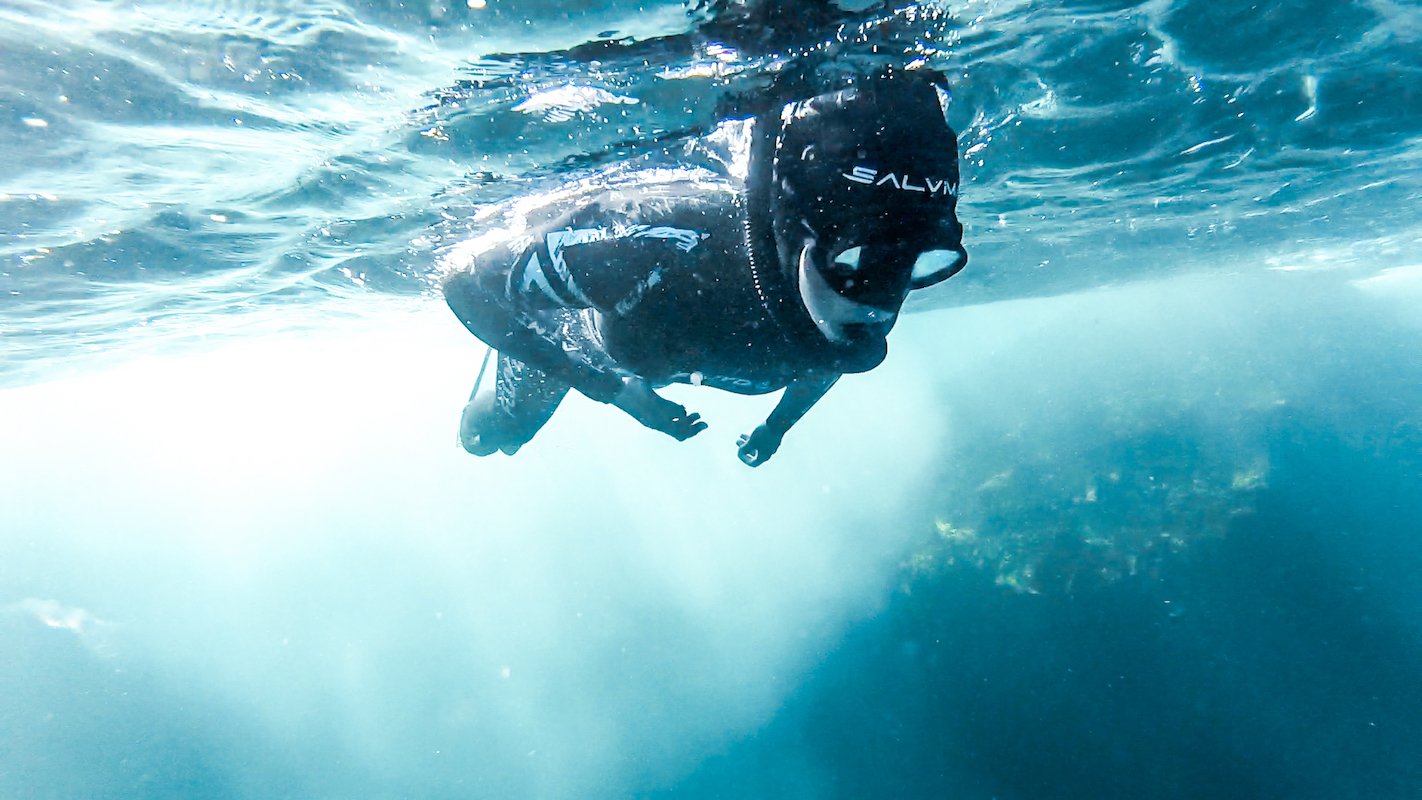
Karim Iliya took this photo when we went diving in this cave as the sunset. I had to hold onto the kayak to catch my breath and focus on something other than the black water….
Everything I’ve described here is an exercise that you can do at home to build some good practices for when you get back into the water, or get to a course. Clearly, it’s not intended to be a full guide to all the things you need to do when you’re in the water.
I’ve said it before but will say it again:-
Never do any kind of breath-holding in water without a trained buddy. Now that you also know a bit about hyperventilation, please also don’t ever do this in water unless an instructor has worked with you work out exactly what you body can handle.
Enjoy getting to know your breathing muscles 🙂
MORE INFO AND LINKS
I always have great things to say about Adam Stern’s videos on breathing and Freediving techniques. Check out this and some of his other breathing videos
If you’re interested in learning a little more about Pranayama Yoga and breathing techniques, have a read through this guide.
If you’re a little weird and into breathing, you might be interested in learning more about Breathwork. The more you play with breathwork, the more you’ll learn about your body. Just always be careful not to mic hyperventilation with breath-holding.
Here is a link to Gert Leroy’s video on mental relaxation techniques, embedded above.